Friday, December 23, 2011

How to Clean Dirty Jewelry--Part II


Or...The Dirty Secret About Jewelry--Part II

In the previous article, we went over how to clean debris from your jewelry that builds up from lotions, soaps, grime and sweat, using an ultrasonic machine. Now we're going to learn about getting rid of tarnish. It's the special enemy of silver jewelry.
Tarnish. An ionic machine is the perfect solution for this problem.

Tarnish can be gone forever with one of these little beauties!

Ionic cleaners

Oh happy day! They finally have been able to produce these for consumers and they are a godsend! If you have a lot of jewelry, especially silver, an ionic cleaner is relatively inexpensive way to blast off tarnish. It won't do a thing to get the debris off, but it will blast away dulling tarnish and make your metal sparkle again.

Ionic cleaners work electrolytically to remove the tarnish.

In other words, they use a small electrical charge from direct current, an alkaline based cleaner and an anode plate in the bottom of the tank. There is a little clip that is the cathode, that you attach to the jewelry to complete the circuit. You'll know it's working because it will give off little bubbles, and with heavily tarnished silver jewelry, you'll notice the smell of hydrogen sulfide, or the rotten egg odor.

A company that I know sells a true consumer level ionic cleaner is Speed Brite. Their smallest one is called a Mini Speed Brite and it uses a 9 volt battery to power it. You won't have to worry about getting electrocuted with the battery, unlike the ones where you plug in the transformer to regular 110 v AC power. Usual disclaimer that I don't get paid, just personally satisfied with the product.

This one is a commercial one, but it works similar to the consumer version.


A commercial ionic cleaner in use with the clip on lead attached to the chain laying across the bottom of the tank

Cleaning chains

This machine is great for cleaning chains, because it can remove tarnish from the inside of the chain links, a boon for something that has very fine links, like a French rope chain. However, if it doesn't remove the tarnish from inside the links, it could mean you have a combination of gunk and tarnish. An ionic cleaner can't remove debris, so you'll have to use some hot water, dish soap and a toothbrush to get rid of the debris so the ionic can get to the tarnish itself. Or use a spiffy ultrasonic machine.

If you're cleaning a chain, you can only clean a long chain a few parts at a time. If the chain crosses over itself, it will deposit the tarnish that it cleaned off the rest of the chain to the part where it crossed itself--and then that part will be really tarnished! So, unclasp the chain, put what you can across the bottom and clean that. Move the clip up to a tarnished area, lay out more of the tarnished part across the bottom and clean a little more.

In this demonstration, I'll show you how a chain is cleaned. First, let me state that this particular chain had an oxidized patina put on it that used several mordants to make the oxidation really stick. In addition, it has also sat around for awhile, so the oxidation is age hardened to the chain. In other words, this type of tarnish is tough to the extreme.


Extremely tarnished chain


When the machine is turned on, it immediately starts bubbling and lifting the tarnish

 
Here you can see the part of the chain that is clean, next to the original tarnished area
 
One thing you need to be aware of, it will also clean off the oxidation that has been deliberately added to enhance details. So if you have something that has a black finish in the recessed areas, clean in stages of 5 seconds at a time. Make sure you're not cleaning off the detail!

Don't use an ionic cleaner for anodized aluminum, niobium or titanium. It will strip off the lovely colors!

Likewise, there are certain stones that shouldn't be used in an ionic cleaner, like some drusy (druzy) crystals that have been anodized. If in doubt, take your piece of jewelry into a professional jeweler's store and ask.

The chain above was dipped 3 times in the 30 second cleaning cycle, for a total of 90 seconds. Your average tarnished piece with oxidized detail may only take 5-10 seconds.

This machine will also clean gold, platinum, white gold, fine silver, coin silver and a host of just about any metal. It's superb for copper.

Finishing up

Be sure to rinse thoroughly with clean running water. Dry with a soft tea towel or old T-shirt. Your jewelry is bright and tarnish free.

With the next article in this series, we'll be going over low tech methods, also known as elbow grease, and a little kitchen chemistry. Not too much elbow grease though, because frankly, I don't have the time and neither do you!

Copyright 2011 by Katherine Palochak

Saturday, December 17, 2011

Handmade Ripple Earrings

The ripples of sand in the ocean waters...

Conjures up an evocative image, doesn't it?

Think of the ripples on the sandy bottom of the edge of a calm sea. The patterns they make have a calming effect on you too. The day is perfect, sunny with a blue sky and a fresh breeze.

You're wading in the ocean, and in the perfectly clear water, you can feel these ripples in the sand under your toes.

These earrings have that same feeling of calm. Repetitive lines, smooth but distinct. The undulating shape enhances the ripples calming effect with a continuation of the flowing lines.

The ripples are oxidized to bring out the pattern, and the highlighted lines have a soft satin sheen to them. The design is exclusive to myself, handmade with a technique that makes a dimensional form, but are still lightweight.

They're entirely handmade from sheet silver and formed into that wonderful shape. Then they are soldered to freeze that shape and make them very strong. They are completed with a handmade earwire that features a ball on the front detail.
This is a great pair of earrings to accessorize jeans for a little more dressed up feel, or for that flirty little dress.


Handmade ripple freeform earrings in sterling silver

If you plan on ordering anything for Christmas from my Etsy shop, do it before 10 p.m. MST, Sunday December 18, 2011.

Those reindeer are slow!

For a limited time, you can purchase these earrings by clicking here.

Copyright 2011 by Katherine Palochak

How to Clean Dirty Jewelry--Part I

Or...The dirty secret about jewelry--part 1

We girls love our pretty sparklies. Even if you don't wear jewelry much, I'll just bet you'll throw on a pair of earrings or a necklace for the office party. Maybe you wear your wedding ring religiously, but would like for it to look as good as it did they day it was first put on your finger.

This is going to be a primer series for what's available to you as the general public. We'll be going through the luxe items in jewelry cleaning, right down to the inexpensive, but highly effective methods, that you can do with common household ingredients and an electric toothbrush, dips, polishes and cloths.

First, let's go over what machines and methods are available for professional jewelers, because the new jewelry cleaners for the general public consumers are spinoffs from these machines. We have ionic cleaners which remove tarnish; ultrasonic cleaners that remove debris, oil and dirt; steam cleaners for likewise removing oil, debris and dirt; and good old-fashioned elbow grease. We also have our bench polishers and flexshafts, with their different buffs and compounds, for actually polishing and removing scratches. There are a few other things that are available for removing caked on debris like lye (definitely not for consumers!) and other caustic methods, but you have to be trained to use them safely and know which stones can handle the different types of acids or bases. Chemistry does play an integral part in cleaning things for us.

Ultrasonic cleaning

Ultrasonic cleaners are ubiquitous in a jeweler's shop. These produce powerful ultrasonic waves that scrub debris off. They have a transducer in the bottom, and some have them in the sides also. They are not silent. They will remind you of sounds you hear in a dentist's office. They are one of the new luxe items for cleaning your jewelry at home.

A lot of the machines I've been able to find in the consumer area are ones that tout they are "ultrasonic," but are not true ultrasonics.

Instead, they rely on sonic waves (think vibration) or an electrolytic process with an alkaline based soap. If ever in doubt, if it doesn't have that high-pitched whine and put holes in aluminum foil, send it back with a big raspberry and get your money back.


A professional ultrasonic with a manual timer and a heater


However, there is one I've found that looks like a mini version of my ultrasonic and is made by the same manufacturer. It has the metal bottom with a raised area that typically houses the transducer. It is a GemOro, and no, I don't get paid or given anything to promote their products. I noticed Amazon.com is selling these mini GemOros on their website for around $100 as of this date of Christmas 2011.


The raised area where the transducer is located beneath the stainless steel tank

If you put a piece of aluminum foil in the tank of a true ultrasonic, it will be full of holes within a few minutes.

If you think sticking your fingers in it to retrieve a piece is okay, prepare to have your fingernails start growing out pitted, or if more than a few times, your fingernails will just fall off. Just because it only seems to "tickle," don't be fooled. These are powerful machines!
 

The aluminum foil folded over a stick that will span the width of the tank


The aluminum foil added to the tank

There are large holes in the aluminum foil now. Particularly notice the ragged edge.


The aluminum foil unfolded. Notice the large missing areas.

 Likewise, you have to be careful what kind of stones you put in them. If your stone is fracture filled (some diamonds are) or oiled (like emeralds) it will destroy them.

If they have natural fractures or inclusions in the stones, like tourmalines, rutilated quartz, cape amethyst, opals or diamonds with a lot of carbon deposits, it will likewise shatter or cleave them.

Oops. Check with your jeweler if you can't bear to take a chance.

Things you should know

When you use an ultrasonic, make sure nothing touches the bottom where the transducer is located. It will cause vibrations that will wear out your transducer prematurely. The exception is soft materials like plastic and silicone. You will see various jigs that suspend jewelry away from the bottom, such as baskets and ring holders.

However, these soft surfaces and metal meshes tend to break up the action of the ultrasonic waves, so it takes longer to clean the jewelry. Jewelers tend to go out of their way to find some way to suspend the jewelry directly into the ultrasonic, using paper clips, bamboo tongs and hand-held glass beakers.

Rinse your jewelry thoroughly in clean water after removing it from the ultrasonic. This helps to remove any remaining debris and cleaning solution. Sometimes a quick scrub with a toothbrush is also needed to get debris out of very small spaces. Wipe the jewelry dry with a soft, clean cloth. Don't put your jewelry in a sunny window to dry. Certain stones can lose their color or change color! Speaking from personal experience, amethyst is one of those stones.

The vibrations of a true ultrasonic will shake slightly loose stones out of their mountings, so take a needle across the face of the stone, pushing slightly and noticing if there's any slight rocking. If there is, take it to a jeweler so the setting can be tightened and you won't lose your stone.

Please check with a reputable jeweler first to make sure your stones will survive ultrasonic treatment.

If you don't want to go to the expense of buying your own machine, or the vagaries of whether a stone will survive or not, then just take your precious to a real jeweler, where they will clean it for a pittance. Most will educate you about your particular piece of jewelry and how to keep it clean between professional cleanings.

Check back next week for the second part of this series with information on ionic cleaners, another luxe item, and why you want one, especially if you have silver.

Copyright Katherine Palochak 12-17-2011

Tuesday, December 13, 2011

Making Jewelry Storybook--Lines Bracelet

 What was it?

The last posting of what I had on the bench, I asked you to guess what it was I was making. I finished it and finally took some photos of it. You see the teaser below? It's a bracelet, all right!


This is how I made it

First, I started with a bracelet blank; a strip of 16 gauge silver that is 6" long. I took pieces of wire and formed them into various shapes, and melted some scrap silver into balls. You can see most of this laid out on the charcoal block. If you're wondering what the white crud is that's all over the metal, it's a flux that prevents firescale. Sterling is notorious for taking up cupric oxide and it leaves a nasty purplish stain in the metal if you don't take steps to prevent it from forming.


All the wires are sanded so they'll sit flush on the bracelet blank. The wires are soldered on a few at a time, with cleaning baths in pickle in between solderings, and of course, more flux to prevent firescale before soldering again.

Here you can see the wires all soldered and the form pre-polished, before filing and forming the blank into the bracelet.


And now the purdy...


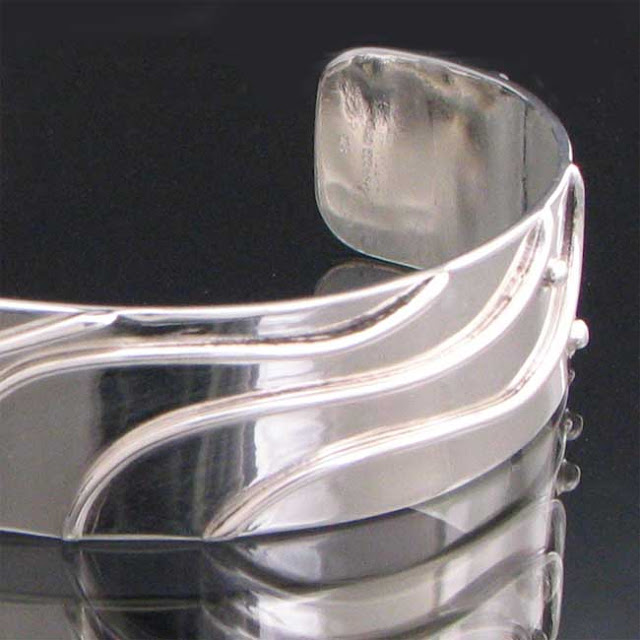
I love the movement of the lines on the bracelet, and how that movement changes, depending on which angle it's viewed. You can go to this link to see a few more pictures of the Flowing Lines bracelet from different angles:


Thanks for stopping by to read! You can find more stories on Making Jewelry Storybook posts. Learn how handmade jewelry goes from sheet and wire to be fabricated into volumetric and gorgeous jewelry.

Copyright 2011 by Katherine Palochak

Friday, December 9, 2011

On the Bench!

Working on the concept
This is one of my current projects. Maybe you can guess what it is, but I'm not going to tell you until it's finished and I have it in a Storybook Jewelry posting. But I like the way the lines move on this piece. It's somewhat similar to the honking big amethyst pendant in another Storybook Jewelry posting. I think I'm going to have to do a whole series of this type of pattern development to get it out of my system. These have been some of my more enjoyable ones, so it might take awhile. I have a whole season of downtime (my favorite and most creative time!) coming up. 


If you have any ideas of what you think "lines" might look good in jewelry, why don't you give me some feedback. You never know when I might use those suggestions to make something. I depend on feedback from people to help me develop jewelry that gets noticed!

Copyright 2011 by Katherine Palochak

For the Metalheads--Sanding Small Parts


Tired of bloody fingers?

It's always a pain to sand small parts quickly and efficiently, and you tend to shred some skin in the process. If you're going to solder two parts together it's imperative that you have both surfaces in good contact with one another, and that means you need to get rid of high spots and have flush fittings.

You need a handle!

You need some tape. Duct tape or electrical tape are good because they have very sticky adhesive. My personal favorite is Gorilla Tape, but sometimes it can be overkill, but it's great for very tricky sanding jobs. For the purposes of the photos, I've used masking tape so it will show up better against the surfaces.

You need to have about 2" of tape for the "handle" and enough additional tape for the "legs" that will cover most of the piece. Double the tape in half, and stick together the first inch for the handle and then stick the two "legs" onto the piece, as shown in the photo below. Press the "legs" firmly onto the piece.


Now you can grasp the "handle" while you're sanding and have a secure grip on your piece. Sanding is easy!


Be sure to remove the tape adhesive before soldering, and make sure the whole piece is squeaky clean before soldering. You know the saying, "If it ain't clean, it ain't gonna solder."

Another pointer for a really small piece

If your piece is too small for tape, you can use the eraser off a pencil as a handle. Just push the eraser onto the piece to embed it. I like the white erasers that come off mechanical pencils, and you can buy them at stationary stores in a tube of erasers for replacements. They have the right amount of stiffness to grab them and not disintegrate, and yet soft enough to push down onto and embed a piece into them.

Wait! What's that sanding surface?

Aha. So you noticed my actual sanding block. I use 3M's finishing film stuck onto one of my bench blocks (I have two), in the 100 micron size. Sorry, can't find the mu symbol for micron in this program. It's self-adhesive, sands quickly and because of the close-tolerance graded media, no huge scratches that have to be sanded down further.

The bench block is perfect. It's very flat, has a decent surface size and it's heavy enough not to move around. I still have the other side to use for flattening things and other stuff a bench block is used for. I do have a small piece of rotary cutting mat I keep under it so it won't scratch my bench (not that you could tell really), and that mat also dampens sound when I'm banging on the bench block.

I don't get paid any kind of endorsement for touting 3M's products (wish I did!), but they have some awesome things I just can't get along without. The finishing film is one, and the other are the bristle disks for both your flex shaft and your bench polisher. That's for another posting.

If you liked this tip, look for other tips in the "For the Metalheads" postings.

Copyright 2011 by Katherine Palochak

Saturday, November 12, 2011

How to Get Started Making Jewelry

I have a lot of people ask me how they can start making jewelry. They love jewelry and they have a creative side, and they'd love to combine the two.

It's not as hard as it used to be

Fortunately, it's not as hard as it used to be when I began. There's a wealth of material out there now, in both books and DVDs. If you go to Amazon.com, all you have to do is a search for "how-to" and then a technique you think you might like to learn. There are some exceptional ones out there for every skill level.

The best way

You're not going to be able to jump right into making soldered jewelry without training of some sort, like a college class or some beginner workshops. There are a lot of different facets required for this type of work, and you have to learn to use a lot of equipment safely. It just helps to have a live body nearby to guide you, so you can observe in real time and ask the questions you need answered.

When formal education isn't an option

If you don't have the time, the money or live close enough for this to be an option, there are other things you can do. There is beading, wire work, resins and polymer clay. You can even find free online videos for many of these things. Also consider getting magazine subscriptions. Some places offer online subscriptions for the same price as print. These are nice because you can print out just the projects you like, and you don't have to be storing a whole magazine. You can even pick up a whole year's worth of back issues on one CD!

There is another alternative called "bridge jewelry" that is generally made with metal clay (Precious Metal Clay and Metal Art Clay). This is where you start crossing over the line into fabricating metal jewelry and can be accomplished with a minimum amount of tools. Even though it's kiln fired and you have no kiln, you can  have it fired at a local pottery. For less than $100 buy a small trinket type of kiln that can be fired with a plumber's portable propane bottle or with a butane torch that is used in restaurants, usually for making creme brulee.

Is any of it free?

Several places I point people to is ArtJewelryMag.com and JewelryArtistMagazine.com. Both have free online video and printed projects, ranging from beginner to intermediate in a variety of mediums. If you type in "jewelry tutorials" in Google, you'll have more tutorials, many free, than you'll have time to explore. Just start with one that you really like, and make sure it's from a reputable source. Two I recommend are Rio Grande http://www.youtube.com/user/RioGrande1944 and Ganoksin http://www.ganoksin.com/benchtube/videos I've seen some things on video from amateurs that are just dangerous, so use careful judgement when trying to learn from free video postings.

And that means...

Don't expect perfect results the very first time. You'll get better with each progressive project though, and with experience you learn how to turn your goofs into serendipitous exploration. Yeah, I know that's a big and pretentious word, but any of my students know that when I yell out, "Serendipity!" in a workshop, it means it's a learning experience. Just read that as, "I did a goof and I'm going to act like it's the greatest design focal point anyone has ever seen." And actually, when you look at it that way, you'll get away from your preconceived ideas and start making things that are truly original and fabulous. Yes, you'll make mistakes, just as we all have, and you'll learn from it. I'm still learning from my mistakes, and I've been doing this for a loooooong time. I don't want to say how long because that will give you an idea of my age!

Occasionally, you'll run across a kindly soul who will mentor you, either in making jewelry, design or learning business skills. They've been down your road at one time, and if they're willing to impart knowledge, listen to them. They're worth their weight in gold!

Copyright 2011 by Katherine Palochak

Friday, November 11, 2011

Thank You to our Veterans

Thank you to all our veterans today, past and present. Those I know include my husband, father, father-in-law, uncles, brother-in-laws, sister-in-laws and nephews. In addition, many of our friends, and those who supported all the veterans on the home front.

Please take a moment to honor this day, even if it is only a moment of reflection.

Friday, October 28, 2011

Odie and the Oh-Duh! Moment

We got Odie from the dog pound. He's German Sheppard, or mostly Sheppard. We named him Odie, after the cartoon Garfield's sidekick. If it's any kind of ball--tennis ball, snow ball, basketball--you get the idea, he has to chase it. He will also go though anything that stands in his way of getting the ball. He's not too bright but he's a lot of fun. One of our kids explains this as, "Not only does his elevator not go to the top floor, there are days when that elevator doesn't get out of the basement."


15 lbs. beef brisket, 107 lbs. walking stomach

As an example, consider the brisket story. Sometimes when our little grocery store in our little town 30 miles away, doesn't have much in the way of selection, I'll buy a whole brisket for $2 a pound, cook up the whole thing and use if for a variety of meals.

One night, after slow roasting the brisket for 4 hours, I proceeded to shred the meat. I was about half-way through the brisket when Mother Nature called.

Animals are not allowed in my kitchen. Ever. We train them from the first day that the kitchen is not their space. We have a little motion detector birdie that acts as the "squealer" until they learn.

So no problem if I happen to need to go upstairs to use the facility, since there isn't one downstairs. I proceeded to do so on this particular day, without any thought of leaving a large dog within sight of a beef brisket unsupervised. Which this particular one weighed in around 15 pounds. The brisket, that is. The dog weighs in at about 107 pounds.

Oh-Duh!

I came back down to finish shredding the brisket. All the meat I had shredded was...GONE! After looking around for the culprit, I see Odie curled up on the cat's sleeping pad, or rather trying to curl up on the cat's sleeping pad. He couldn't quite get curled up because his stomach looked like he was ready to birth an elephant. And he is trying his hardest to act nonchalant, as if nothing has happened, nothing is out of the ordinary. He had the same innocent look on his face like in the picture above.

"Odie..."

Odie's eyebrows twitch up and down. He puts on his most innocent look.

"Who me?"

Odie spends the next two days outside more than in. We could have had a methane explosion if he was around, not to mention the desperate dashes outside. He also didn't want anything to eat for the next two days. His innards were working overtime, and didn't need any additional abuse, I think.

Anymore, if I'm in the middle of something involving food, and I can't see the kitchen directly, I pop whatever it is in the oven and close the door. Just in case.

Copyright 2011 by Katherine Palochak

Wednesday, October 19, 2011

Making Jewelry Storybook--Baroque Ammolite Pendant

A lapidary from Canada gave me some gorgeous free form (baroque) ammolite for some help I had given to him on making a concha repousse' die. There are only a few places in the world that have ammolite. Ammolite is the opalized form of ammonite. Ammonite is the fossilized form of a cephalopod of the Cretaceous period. They looked very much like a nautilus. The opalization occurs mostly in the greens and reds, but occasional flashes of bright cobalt blue are also visible.

The one I chose to work with was a large piece. I wanted to make a setting that was in keeping with the ancient properties of the ammolite, and I wanted something to bring out the color, and balance the shape.


After sketching out the basic idea, I began playing with some things that might accomplish this.


What I started with

I chose some pine needle castings for their strong linear forms and some chrome diopsides in various hues to accent the green in the ammolite. I had to make some tube settings by soldering together some telescoping tubing since I didn't have the right size of tubing.


Taking shape!

Here you see the tubing soldered together and cut into settings, ready for the seats for the stones' girdles to be cut. I've arranged the pieces loosely to approximate how the final setting will look.


Ta-da!

Here's the finished piece that I've put on my Etsy website. Gorgeous, isn't it? This is why I like working with pretty stones.


Thanks for the stones Gerry--they are absolutely lovely! (And I still think I got the better part of the deal.)

If you've enjoyed the step-by-step story of how a piece of jewelry is made, look for similar stories in the "Making Jewelry Storybook" sections.

Copyright 2011 by Katherine Palochak

Friday, October 7, 2011

For the Metalheads--3 Steps to Cutting Tube Settings

Tube settings are really nice for setting stones, but if you're making your own from tubing, it can be frustrating. You carefully mark it, cut it, and you think you have it level...And darnit, it's not level and it's canting to the side. So you carefully sand it, taking down the high side, and it looks level until you set it on your bench block to check it, and darnit, it's still not level! You seriously contemplate buying one of those expensive jigs so you won't have to keep going through this frustration.

No frustration method

Well, this is the cheap and fabulously easy way to do it. First you need to get a mini tubing cutter from a hardware store. It's used for cutting small copper pipe for gas or waterline piping. They cost less than getting the #1 meal from McDonald's and you'll still have change left over.

Mark it

Next mark how high your setting needs to be with a pair of calipers. You only need to mark the tube just enough so you can line up the mark to the roller wheels in the tubing cutter.


Cut it

Align the mark you made on the tubing to the sharp roller. Adjust the knob (black knurled knob in this photo) so that it snugs the tubing up between the sharp roller and the two roller guides. Make sure the tubing is straight and snug.


Grab the other end of the tubing with something to keep it from rotating while you're cutting. I usually use my round nose pliers. Put a little lube on the cutting wheel of the tube cutter. Rotate the cutter around the tube. As it cuts, it gets a little loose. You have to tighten the wheel by using the knurled knob every few turns to snug it up to your tubing. Keep rotating until you're all the way through.


Finish it!

Ream the bur from the inside. I use my round pliers for this or I stick my tweezers in the end to ream out the bur.


Finish by sanding the cut edge to smooth it.


Your result is perfectly perpendicular cuts and you can repeat it exactly for however many settings you need.


This also works for heavy wire. Although the cutter won't go all the way through the wire, it will leave you a very nice slot so you can saw it evenly. The caveat is that it won't do very short lengths for tube settings, and there is a limit on how small or large the diameter of the tubing you can use in the gadget. When your tubing gets too short to use the tube cutter, use the left over piece of tubing for a bail.

Look for other postings like this in "For the Metalheads" sections.

Copyright 2011 by Katherine Palochak

Sunday, October 2, 2011

Cow Patty Cookies

a.k.a. Cow Patties

Everyone has their favorite cookie recipe. This is the one my family seems to like the best. If you're allergic to anything, don't eat these cookies. And yes, they look amazingly like their namesake, so best to keep the name to yourself until well after a guest has one.


Cow Patty Cookies

2 sticks (1 C.) melted margarine, not butter
2 C. white sugar
2 C. brown sugar
18 oz. jar of peanut butter
6 eggs
1 Tbsp. syrup of any kind
1 Tbsp. vanilla
4 tsp. baking soda
18 oz. box of quick oats
12 oz. bag of chocolate chips
1 C. chopped nuts
14 oz. bag coconut
1 C.-2 C. raisins

Melt the butter, stir in the sugars. Add the peanut butter, syrup, vanilla and eggs, and stir well. Add the baking soda and stir well. Add the quick oats and stir well. Add the chocolate chips, nuts, coconut and raisins and stir well.

Drop by rounded teaspoonfuls on lightly greased cookie sheet. Bake at 350 degrees F. for about 10 min. until medium golden brown and they have just started to slump. Cool slightly and remove to cool completely. Makes about 10 dozen.

These store well, and can be frozen cooked or as raw dough. In the summertime I take the raw dough and press it into a cookie sheet until all the dough is the same level. Another cookie sheet on top of the dough works well to level it, as my cookie sheets have a lip and are the same size.

Then I lightly score small squares of the sheet of dough, and make a package out of 2 dozen of the squares at a time. I wrap them in that Press ‘n’ Seal, then put those stacked up into a gallon size heavy duty freezer Ziploc.

When I want some cookies, I can just take out a package and cook up a couple dozen, which is about right for after supper while I do the dishes. Because it’s fairly late at night, it doesn’t heat up the kitchen.

The recipe came from an aunt who had an off-beat Okie humor. Is there such a thing as off-beat Okie humor? Or is it all Okie humor is off-beat and completely normal? Well, actually, she was a transplant, so we can't say all of it was Okie humor..

Copyright 2011 by Katherine Palochak


Saturday, September 24, 2011

Workshops in Lander, WY

I'm going to be doing several workshops in Lander in October. The first one is Oct. 1, 2011, and it will be an Egyptian coiled bracelet. All the tools will be supplied and you'll take your finished project home that day.


On October 15, 2011 I'll be doing a class on introductory etching on metal. This is a fun workshop and we won't be using caustic acid, but instead a mordant that is generally used to dye textiles. There won't be anything to memorize and the projects are simple to make. All the supplies are included in the cost.


With this one we'll be doing direct resist methods, which means you draw on your own patterns. It does not mean you need to be any kind of an artist! You can write a name or draw a stick figure, and you'll be amazed at how well it looks on metal. Etching is also useful for the guys who want to do PCBs for their electronic projects.

This isn't a full-fledged workshop course on etching, but more of a laid-back and fun class. You'll have great projects to take home!

You can register for the classes through Central Wyoming College. Click on Non-Credit Courses for the Fall Schedule at this link:

http://www.cwc.edu/what/outreachcenters/lander

Friday, August 19, 2011

Repousse die forming

Making conchas are usually made with a matching male/female die called a repousse die. There are some commercially made ones, but many traditional silversmiths make their own. To make them and use them takes a good deal of skill, even with the commercially made ones. The commercial ones don't come looking pretty like the one below. They have to be dressed, trued, registered and polished. Once that is done, then you can start using them.


This pair of earrings are made with small disks at the top to make the traditional round concha design, and the lower part of the earrings are made with a large fan shape from the same round concha die.


The conchas below are the typical round shape. The patterns are diamond cut.


Many people mistakenly call conchas "conchos." Concha is from the Spanish word for conch and other sea shells, and it gender specific for female. However, in certain countries it is also slang for a specific part of the female anatomy. It's not a nice slang word, so if you're south of the U.S. border, feel free to use the word "concho"!

Copyright 2011 by Katherine Palochak
Monday, August 15, 2011

For the Metalheads~Organizing

We all have our little tricks for keeping things organized in our studios and around the bench. We have so many of those little things. Here's a few of mine that I use, and maybe you'll be able to use one or two of them yourself.

How to survive finding things during a workshop

Use pill bottles for organizing stamps, buffs, points and such and to keep them clean. They're also great when you're going to a workshop.


A buddy that sticks with you

I keep a couple of magnets stuck on my light over the work area. I use one for my keychuck, and it's also a handy place to park a bit or point if  I'm switching back and forth between a  few of them. I have another magnet that holds my sawblades that I'm currently using.


The easiest way to lube

From the Orchid Forum, I learned the neat trick of using pill containers for holding cotton soaked with lube for my burs. It's a lot easier to dip your bur into the cotton than trying to apply one drop at a time to the bur, or to keep the hole filled with lube. I do like Bur Life from Rio Grande. It cuts down on the chatter better than any other lube I've tried.


A file box for metal?

I've found a file box to be the easiest way of organizing my silver wire, and you can also use it for sheet. On the left side I have "round, 1/2 round, square" etc., and on the right I have the sizes. This way I can find what I want easily. Each wire is put inside a ziplock to keep them from getting messed up, especially on the very fine wire, and the ziplocks keep them from getting tarnished. I have several tabs with "order" on them so I can put it on whichever file folder that has wire that's getting low. That makes it really easy when I'm putting together an order.


Shallow drawers=less headaches

I splurged and bought myself a map chest. These have shallow, large drawers that are perfect for organizing a bunch of little parts. I have gem jars and those nifty watchmaker's tins from Lee Valley Tools. I like the tins better because I can write either on the glass tops with a marker or on the bottoms, and when I've used up the contents, the marker can be wiped off with some alcohol. It's also great for keeping findings and small tools organized. I got my map chest from Home Decorators Outlet for $300 shipped, and it's all wood, mostly solid. It weighed a ton and it was already assembled!


Super Mag!

I have super magnets, aka rare earth magnets, scattered all around the perimeter of my bench. They keep my tools that I'm using for a particular project handy without them being in my catch pan. That way I don't have to worry about dropping a stone on them and scratching some of the softer ones. The cheapest I've found them, depending on the sizes, are Amazon and Ebay.


Hope the hints help. Stay tuned for other postings on "For the Metalheads."

Copyright 2011 by Katherine Palochak

Wednesday, August 10, 2011

Fold forming

One of the techniques I use in some of my work is called fold forming. It can have soft folds that make metal look like fabric, sharp folds that cause the metal to stretch into three-dimensional forms, or a combination of folding and forging to make fantastical forms. The picture below is an example of a soft fold.


The leaves are an excellent example of fold forming because they have a central spine.


Here's a leaf pendant made in an Art Nouveau style.


You can get great dimensional shape like these 3-D flowers and cups. These are more appropriate for sculpture, hollow ware and decorative elements.


This is a big leaf and a boat shape.


I like the fold forming techniques for their organic nature, but I lean more towards the score folding techniques because they're more easily adapted to jewelry.

Copyright 2011 by Katherine Palochak

Tuesday, August 9, 2011

Making Jewelry Storybook--A commissioned redesign

I do custom work, and this is the story of one commission.

A customer wanted to use some jewelry she inherited from her parents and grandparents. She wanted a pendant using parts of their gold and diamonds. She wanted to use as many of the diamonds as she could. She brought a lot of jewelry with her at our sit down. We chose the following pieces.

The old jewelry

A pair of gold wedding bands.


 A wedding set consisting of various sized diamonds.


Designing with the customer

We began the process of designing after determining from her other jewelry and discussing what she liked and why. She liked simple but flowing shapes, and she settled on the design at the top right.


Changing old to new

I began by rolling the heavier of the two wedding bands through a mill, and then changed the shape through forging.


I soldered the form together and cut off the top piece.


Putting in the heirloom diamonds

Here you see it set with 5 of the largest diamonds, none of which were very large, ranging in size from 1 pointers to a 3 pointer. To give you an idea, there are 100 points in a carat stone. I made a generous hidden bail on the back from one of the rings in the diamond wedding set, because she wanted to wear it with a variety of chains she already had, including an omega.

She's a very petite lady and I had to be careful not to make the pendant too large, and I didn't want to gild the lily, so I didn't use all the diamonds. Her other wedding band and the extra diamonds were returned to her. Maybe she'll want me to make her a pair of earrings in the future.


Again, not professional photos, just shots on the bench as I went along making the piece.

If you've enjoyed the step-by-step story of how a piece of jewelry is made, look for similar stories in the "Making Jewelry Storybook" sections.

Copyright 2011 by Katherine Palochak